I created this post for people who plan to start using Terraform on a project, in the hope it may help them save some time by sharing some of my lessons learned. And yes, the title is true – I wish I had known most of these lessons before starting to work with Terraform. I have split 11 lessons across two posts - this is part 1.
1. Always use Terraform
Terraform is a tool for building, changing and versioning infrastructure safely and efficiently, helping you to define your Infrastructure as Code (IaC). Using Terraform and then making changes with other tools besides Terraform, like web consoles, CLI tools or SDKs, will create inconsistencies and affect the stability and confidence of the infrastructure.
Terraform will try to maintain the previously defined state, and any of the manual changes won’t be on the defined version control system (VCS). If a redeployment is required, those changes will be lost.
Exceptions can be necessary, but these are only for specific needs, like security restrictions (key pairs) or the specific debugging of issues (security group rules). But keep in mind that these changes should affect controlled components.
2. Use modules to avoid repetitive work
How do you avoid having to copy and paste the code for the same app deployed in multiple environments, such as stage/services/frontend-app and prod/services/frontend-app?
Modules in Terraform allow you to reuse predefined resource structures. Using modules will decrease the snowflake effect and provide a great way to reuse existing infrastructure code.
Modules have some variables as inputs, which are located in different places, meaning a different folder or even repository. They define provider elements and can also define multiple resources:
# my_module.tf:
resource "aws_launch_configuration" "launch_configuration" {
	name = "${var.environment}-launch-configuration-instance"
	image_id = "ami-04681a1dbd79675a5"
    instance_type = "t3.micro"
}

resource "aws_autoscaling_group" "autoscaling_group" {
	launch_configuration = "${aws_launch_configuration.launch_configuration.id}"
    availability_zones = ["us-east-1a"]
    min_size = "${var.min_size}"
    max_size = "${var.max_size}"
}
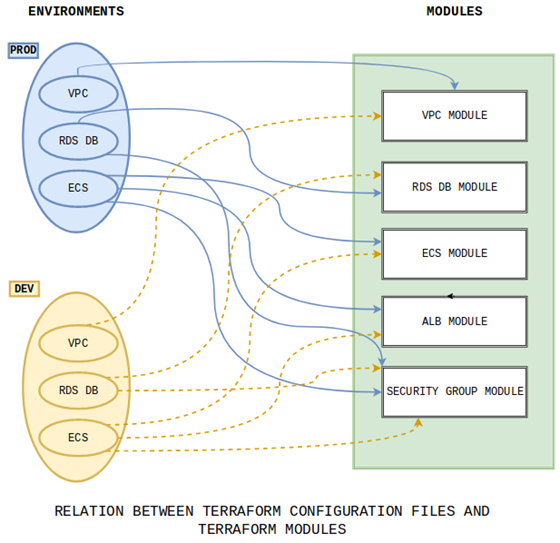
Modules are called using the module block in our Terraform configuration file; variables are defined according to the desired requirement. In the example above, we call the module twice but with different values for each environment.
The following example uses the ‘my_module’ module and creates an AutoScaling Group (ASG) with a minimum instance size of 1 and a maximum of 2 and a launch configuration. Both resources are defined with a specific prefix name, in this case ‘dev’:
# my_dev.tf
module "development_frontend" {
	source = "./modules/my_module"
    min_size = 1
    max_size = 2
    environment = "dev"
}
Afterwards, we can reuse the module. In our production environment, we call the same ‘my_module’ module and create the ASG with a minimum size of 2 instances and a maximum of 4, and the launch configuration, both with the specified ‘prod’ prefix:
# my_prod.tf
module "development_frontend" {
	source = "./modules/my_module"
    min_size = 2
    max_size = 4
    environment = "prod"
}

Figure 1: Relation Terraform config files and modules
It’s recommended to define and use different versions of a specific module, which allows us to work using a version control system. If we store our modules in a VCS, like Git, we can use tags or branch names to call a specific version using the ‘?ref=’ option:
module "my-db-module" {
	source = "git::ssh://git@mygitserver.com/my-modules.git//modules/my_module?ref=feature-branch-001"
    allocated_storage = "200"
    instance_class = "db.t2.micro"
    engine = "postgres"
3. Manage Terraform state
The Terraform state file is important because all the current states of our infrastructure are stored here. It’s a .json file normally located in the hidden .terraform folder inside your Terraform configuration files (.terraform/terraform.tfstate), and it is autogenerated when you execute the command ‘terraform apply’. Directly editing the state file is not recommended.
This is an example of a terraform.tfstate file:
{
	"version": 3,
    "terraform_version": "0.11.8",
    "lineage": "35a9fcf6-c658-3697-9d74-480408535ce6",
    "modules": [
    	{
        	"path": ["root"],
            ……………………………………
            "depends_on": []
        }
    ]&
}
As we work on our infrastructure, other collaborators might need to modify it and apply their changes, changing the Terraform state file, which is why I recommend storing this file in shared storage. Terraform supports multiple back ends to store this file, like etcd, azurerm, S3 or Consul.
Below is an example of how to define the path of the Terraform state file using S3. DynamoDB is also used to control the lock access to the file, giving write access to only one user at a time, which is needed in case several people are working on the same infrastructure.
terraform {
	required_version = ">= 0.11.7"
    backend "s3" {
    	encrypt = true
        bucket = "bucket-with-terraform-state"
        dynamodb_table = "terraform-state-lock"
        region = "us-east-1"
        key = "locking_states/terraform.tfstate"
    }
}
As the Terraform state file could store sensitive information, the storage should be encrypted using the options provided by your back end.
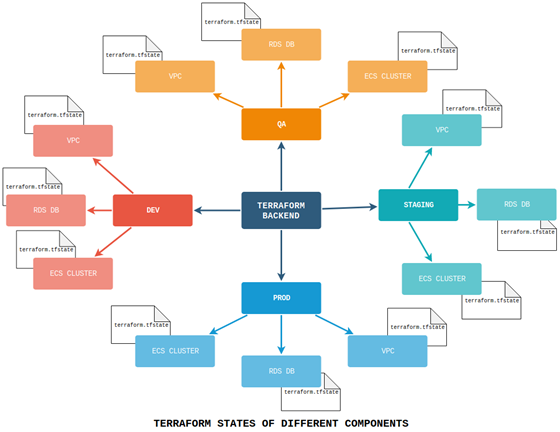
Also, as your infrastructure grows and you need to define multiple environments, you might need to split your Terraform state by environments and by components inside each environment. This way, you will be able to work on different environments at the same time, and multiple collaborators could work on different components of the same infrastructure without being locked, for example one user modifying databases and another modifying load balancers).
This can be achieved using the specific key component in the back-end definition:
# my_infra/prod/database/main.tf:
...
key = "prod/database/terraform.tfstate"
...
# my_infra/dev/database/main.tf:
...
key = "dev/database/terraform.tfstate"
...
# my_infra/dev/loadbalancer/main.tf:
...
key = "dev/loadbalancer/terraform.tfstate"
...

Figure 2: Terraform back-end files
4. Split everything
As mentioned above, splitting the Terraform state by environments and components will help you build all the different components of your infrastructure separately. What kind of division should you pursue? That depends on the size of the project, its complexity and the size of your team.
For example, some component options can be defined inside themselves as inline blocks. But sometimes, it’s recommended to define these structures in a different resource. In this example, an AWS route table has the routes definition inline:
resource "aws_route_table" "route_table" {
	vpc_id = "${aws_vpc.vpc.id}"
    route {
    	cidr_block = "10.0.1.0/24"
        gateway_id = "${aws_internet_gateway.example.id}"
    }
}
Alternatively, you can achieve the same result with a separate AWS route resource:
resource "aws_route_table" "route_table" {
	vpc_id = "${aws_vpc.vpc.id}"
}
resource "aws_route" "route_1" {
	route_table_id = "${aws_route_table.route_table.id}"
    destination_cidr_block = "10.0.1.0/24"
    gateway_id = "${aws_internet_gateway.example.id}"
}
This gives you flexibility when it comes to defining your infrastructure as it increases in complexity. Just keep in mind that it’s easier to group components once they are defined, rather than splitting them after you have already deployed your infrastructure.
As the level of complexity increases, you can deploy all your infrastructure with one command, using Bash scripts or tools like Ansible or Terragrunt.
I hope you found this helpful! Stay tuned to read part 2 of the lessons I’ve learned through working with Terraform – in the meantime, you can consult the Terraform documentation to help you get started with the basics.
