When working with our customers to design solutions using a microservices architecture, we often encounter the requirement for quick and easy management of the entire system and the highest possible degree of automation to avoid having to adjust individual components.
This is a real challenge, which is why we prepared a tutorial that demonstrates the simplest possible way to establish a .NET-based microservices architecture that can be quickly and very easily scaled and adapted to customer requirements.
We did not want to have to make any changes to the code or settings of individual services but control the system just by orchestrating containers in Docker.
The result is a simple microservices architecture that can be easily scaled with just a few changes in container settings. The scaling of the application is handled by two open-source components: Ocelot, which is a gateway and load balancer, and HashiCorp Consul*, the identity-based network service which acts as a service discovery agent.
Such an architecture allows us to redeploy multiple instances of a single service without coordinating the deployment with other services. The redeployed service instances are automatically registered for service discovery and immediately available through the gateway. You can imagine how big a boost this is for any development team!
Of course, using a single gateway service becomes a single point of failure in our architecture, so we need to deploy at least two instances of it to have high availability, but we will leave that problem for you to play with.
The Consul service
A key part of this tutorial is the use of the Consul service to dynamically discover service endpoints. Consul automatically manages a service registry, which is updated when any new instance of a service is registered and becomes available to receive traffic. Once a service is registered with Consul, it can be discovered using the standard DNS mechanism or via a custom API. This helps us to easily scale our services.
If we are running multiple instances of the same service, Consul will randomly distribute traffic across the different instances, balancing the load between them.
Consul also provides health checks on service instances registered with it. If one of the services fails its health check, the registry will recognise this condition and will avoid returning that service’s address to clients looking up the service.
Service self-registration
The first step is for a service instance to register itself with the service discovery service by providing its name, ID and address. The gateway is able to retrieve the address of this service by querying the Consul service discovery API using the service name or ID.
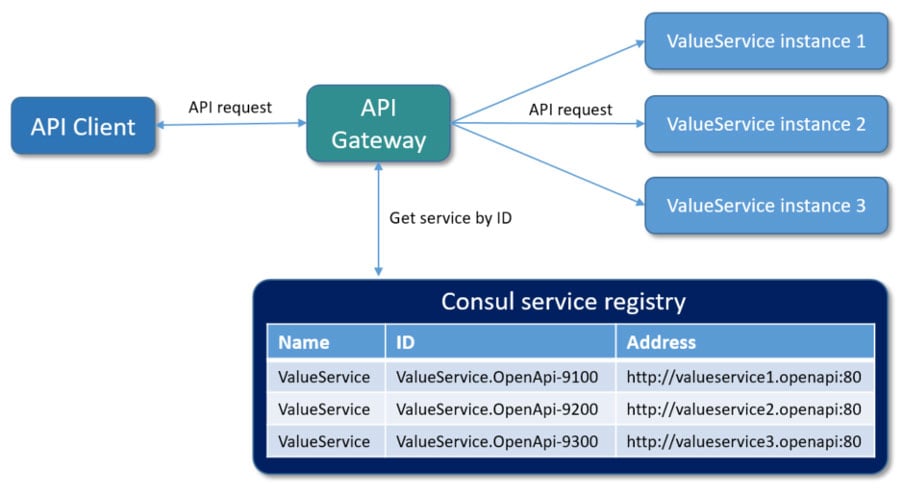
The key thing to note is that the service instances are registered with a unique service ID to differentiate between the various instances of a service which are running on the same Consul service agent. Each service must have a unique ID per node, so if their names were to conflict (as in our case), then the unique IDs allow each of them to be unambiguously identified.
Architecture of our tutorial application
Our tutorial uses three instances of a very simple microservice, which returns the request URL and ID, and a single gateway microservice (Ocelot) to provide an API to external clients. All of the services, including Consul, are containerised with Docker, based on lightweight GNU/Linux distributions of their base container images.

Implementation of our tutorial application
Let’s look at how we can implement self-registration in the .NET application. First, we need to read the configuration required for service discovery from environment variables that were passed through the docker-compose.override.yml file.
public static class ServiceConfigExtensions
	{
		public static ServiceConfig GetServiceConfig(this IConfiguration configuration)
		{
			if (configuration == null)
			{
				throw new ArgumentNullException(nameof(configuration));
			}

			var serviceConfig = new ServiceConfig
			{
				Id = configuration.GetValue("ServiceConfig:Id"),
				Name = configuration.GetValue("ServiceConfig:Name"),
				Address = configuration.GetValue("ServiceConfig:Address"),
				Port = configuration.GetValue("ServiceConfig:Port"),
				DiscoveryAddress = configuration.GetValue("ServiceConfig:DiscoveryAddress"),
				HealthCheckEndPoint = configuration.GetValue("ServiceConfig:HealthCheckEndPoint"),
			};

			return serviceConfig;
		}
	}
After reading the configuration required to reach the service discovery service, we can use it to register our service. The code below is implemented as a background task, a hosted service, that registers our service in Consul by overriding any previous information about the service. If the service is shutting down, it is automatically unregistered from the Consul registry.
public class ServiceDiscoveryHostedService : IHostedService
	{
		private readonly IConsulClient _client;
		private readonly ServiceConfig _config;
		private AgentServiceRegistration _registration;

		public ServiceDiscoveryHostedService(IConsulClient client, ServiceConfig config)
		{
			_client = client;
			_config = config;
		}

		// Registers service to Consul registry
		public async Task StartAsync(CancellationToken cancellationToken)
		{
			_registration = new AgentServiceRegistration
			{
				ID = _config.Id,
				Name = _config.Name,
				Address = _config.Address,
				Port = _config.Port,
				Check = new AgentServiceCheck()
				{
					DeregisterCriticalServiceAfter = TimeSpan.FromSeconds(5),
					Interval = TimeSpan.FromSeconds(15),
					HTTP = $"http://{_config.Address}:{_config.Port}/api/values/{_config.HealthCheckEndPoint}",
					Timeout = TimeSpan.FromSeconds(5)
				}
			};

			// Deregister already registered service
			await _client.Agent.ServiceDeregister(_registration.ID, cancellationToken).ConfigureAwait(false);

			// Registers service
			await _client.Agent.ServiceRegister(_registration, cancellationToken).ConfigureAwait(false);
		}

		// If the service is shutting down it deregisters service from Consul registry
		public async Task StopAsync(CancellationToken cancellationToken)
		{
			await _client.Agent.ServiceDeregister(_registration.ID, cancellationToken).ConfigureAwait(false);
		}
	}
Finally, we need to register our configuration and hosted service, with its Consul dependencies, to the dependency injection container. To do this, we use a simple extension method that can be shared within our services:
public static class ServiceDiscoveryExtensions
	{
		public static void AddConsul(this IServiceCollection services, ServiceConfig serviceConfig)
		{
			if (serviceConfig == null)
			{
				throw new ArgumentNullException(nameof(serviceConfig));
			}

			var consulClient = new ConsulClient(config =>
			{
				config.Address = serviceConfig.DiscoveryAddress;
			});

			services.AddSingleton(serviceConfig);
			services.AddSingleton<iconsulclient, consulclient="">(_ => consulClient);
			services.AddSingleton<ihostedservice, servicediscoveryhostedservice="">();
		}
	}
Once we have registered our services in the service discovery service, we can start implementing the API gateway.
Creating an API gateway using Ocelot
Ocelot requires that you provide a configuration file that contains a list of Routes (configuration used to map upstream requests to API endpoints) and a GlobalConfiguration (other configuration settings like QoS, rate-limiting parameters etc).
In the ocelot.json file below, you can see how we forward HTTP requests. We have to specify which type of load balancer we will use. In our case, this is a RoundRobin that loops through the available services and sends requests to them.
It is important to set Consul as a service discovery service in the GlobalConfiguration for the ServiceDiscoveryProvider.
{
	"Routes": [
		{
			"Servicename": "ValueService",
			"DownstreamPathTemplate": "/{url}",
			"DownstreamScheme": "http",
			"UpstreamPathTemplate": "/{url}",
			"UpstreamHttpMethod": [ "GET" ],
			"UseServiceDiscovery": true,
			"RouteIsCaseSensitive": false,
			"LoadBalancerOptions": {
				"Type": "RoundRobin"
			},
			"QoSOptions": {
				"ExceptionsAllowedBeforeBreaking": 3,
				"DurationOfBreak": 5000,
				"TimeoutValue": 2000
			}
		}
	],
	"GlobalConfiguration": {
		"RequestIdKey": "OcRequestId",
		"UseServiceDiscovery": true,
		"ServiceDiscoveryProvider": {
			"Host": "consul",
			"Port": 8500,
			"Type": "PollConsul",
			"PollingInterval": 100
		}
	}
}
Some of the more important ServiceDiscoveryProvider settings in the GlobalConfiguration section are as follows:
- Host – the host of Consul
- Port – the port of Consul
- Type: Consul – means that Ocelot will get service information from Consul per request
- Type: PollConsul – means that Ocelot will poll Consul for the latest service information
- PollingInterval – tells Ocelot how often to call Consul for changes in the service registry
After we have defined our configuration, we can start to implement an API gateway based on .NET 5 and Ocelot. Below, you can see the implementation of an Ocelot API gateway service that uses our ocelot.json configuration file and Consul as a service registry.
The Program class contains the Main() method, which is the entry point of the .NET applications. The Program class also creates the web host upon startup.
public class Program
	{
		public static void Main(string[] args)
		{
			CreateHostBuilder(args).Build().Run();
		}

		public static IHostBuilder CreateHostBuilder(string[] args) =>
			Host.CreateDefaultBuilder(args)
				.UseContentRoot(Directory.GetCurrentDirectory())
				.ConfigureWebHostDefaults(webBuilder =>
				{
					webBuilder.UseStartup();
				})
				.ConfigureAppConfiguration((hostingContext, config) =>
				{
					config
						.SetBasePath(hostingContext.HostingEnvironment.ContentRootPath)
						.AddJsonFile("appsettings.json", false, true)
						.AddJsonFile($"appsettings.{hostingContext.HostingEnvironment.EnvironmentName}.json", true, true)
						.AddJsonFile("ocelot.json", false, false)
						.AddEnvironmentVariables();
				})
				.ConfigureLogging((builderContext, logging) =>
				{
					logging.AddConfiguration(builderContext.Configuration.GetSection("Logging"));
					logging.AddConsole();
					logging.AddDebug();
					logging.AddEventSourceLogger();
				});
	}
The Startup class configures the application’s services and defines the middleware pipeline. In this step, it’s important to include the AddConsul middleware in the pipeline using the AddConsul extension:
public class Startup
	{
		public void ConfigureServices(IServiceCollection services)
		{
			services.AddOcelot()
				.AddConsul()
				.AddCacheManager(x =>
				{
					x.WithDictionaryHandle();
				})
				.AddPolly();
		}

		public void Configure(IApplicationBuilder app, IWebHostEnvironment env)
		{
			app.UseOcelot().Wait();
		}
	}
Running the services in Docker
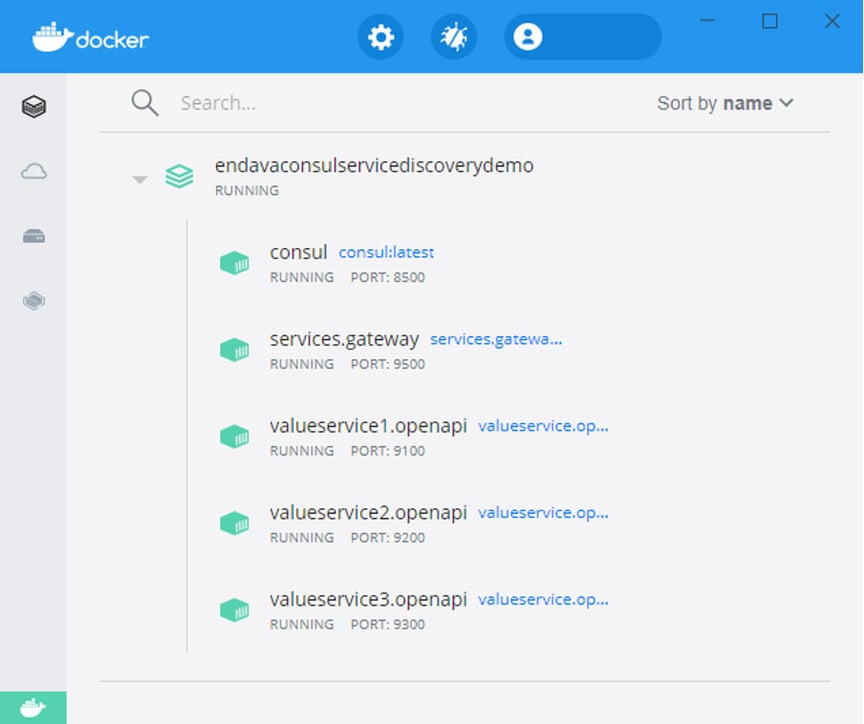
As mentioned earlier, we will containerise all of the services, including Consul, with Docker, using lightweight GNU/Linux distributions for the base container images.
For this, we first need to set up our docker-compose.yml, the config file for Docker Compose. It allows us to deploy, combine and configure multiple Docker containers at the same time. In our tutorial, it looks like this:
version: '3.9'

services:
   consul:
        image: consul:latest
        command: consul agent -dev -log-level=warn -ui -client=0.0.0.0
        hostname: consul
        container_name: consul
        networks:
            - common_network

   valueservice1.openapi:
        container_name: valueservice1.openapi
        image: valueservice.openapi:latest
        restart: on-failure
        hostname: valueservice1.openapi
        build:
            context: .
            dockerfile: src/ValueService.OpenApi/Dockerfile
        networks:
            - common_network

   valueservice2.openapi:
        container_name: valueservice2.openapi
        image: valueservice.openapi:latest
        restart: on-failure
        hostname: valueservice2.openapi
        build:
            context: .
            dockerfile: src/ValueService.OpenApi/Dockerfile
        networks:
            - common_network

   valueservice3.openapi:
        container_name: valueservice3.openapi
        image: valueservice.openapi:latest
        restart: on-failure
        hostname: valueservice3.openapi
        build:
            context: .
            dockerfile: src/ValueService.OpenApi/Dockerfile
        networks:
            - common_network

   services.gateway:
        container_name: services.gateway
        image: services.gateway:latest
        restart: on-failure
        hostname: services.gateway
        build:
            context: .
            dockerfile: src/Services.Gateway/Dockerfile
        networks:
            - common_network

networks:
    common_network:
        driver: bridge
Note that our services don’t contain any configuration files, as we are going to use the docker-compose.override.yml file to provide configuration values. In this configuration file, you can override existing settings from docker-compose.yml or even add completely new services. In our tutorial, it looks like this:
version: '3.9'

services:
    consul:
        ports:
             - "8500:8500"

    valueservice1.openapi:
        environment:
          - ASPNETCORE_ENVIRONMENT=Development
          - ServiceConfig__Id=ValueService.OpenApi-9100
          - ServiceConfig__Name=ValueService
          - ServiceConfig__DiscoveryAddress=http://consul:8500
          - ServiceConfig__Address=valueservice1.openapi
          - ServiceConfig__Port=80
          - ServiceConfig__HealthCheckEndPoint=healthcheck
        ports:
            - 9100:80
        depends_on:
            - consul

    valueservice2.openapi:
        environment:
          - ASPNETCORE_ENVIRONMENT=Development
          - ServiceConfig__Id=ValueService.OpenApi-9200
          - ServiceConfig__Name=ValueService
          - ServiceConfig__DiscoveryAddress=http://consul:8500
          - ServiceConfig__Address=valueservice2.openapi
          - ServiceConfig__Port=80
          - ServiceConfig__HealthCheckEndPoint=healthcheck
        ports:
            - 9200:80
        depends_on:
            - consul

    valueservice3.openapi:
        environment:
          - ASPNETCORE_ENVIRONMENT=Development
          - ServiceConfig__Id=ValueService.OpenApi-9300
          - ServiceConfig__Name=ValueService
          - ServiceConfig__DiscoveryAddress=http://consul:8500
          - ServiceConfig__Address=valueservice3.openapi
          - ServiceConfig__Port=80
          - ServiceConfig__HealthCheckEndPoint=healthcheck
        ports:
            - 9300:80
        depends_on:
            - consul

    services.gateway:
        environment:
            - ASPNETCORE_ENVIRONMENT=Development
            - ASPNETCORE_URLS=http://+:80
        ports:
            - 9500:80
        depends_on:
            - consul
            - valueservice1.openapi
            - valueservice2.openapi
            - valueservice3.openapi
Starting the containers
To execute the Docker Compose file and start the containers, open Powershell and navigate to the compose file in the root folder. Execute the following command: docker-compose up ‑d ‑build, which starts and runs all of the containers. The ‑d parameter executes the command as a ‘detached’ command. This means that the containers run in the background and don’t block your Powershell window. To check the running containers, use the command docker ps.
Consul web UI
Consul offers a nice web user interface right out of the box. You can access it on port 8500 (http://localhost:8500). Let’s look at some of the screens.
Below is the home page for the Consul UI services, showing all of the relevant information related to a Consul agent and web service check:
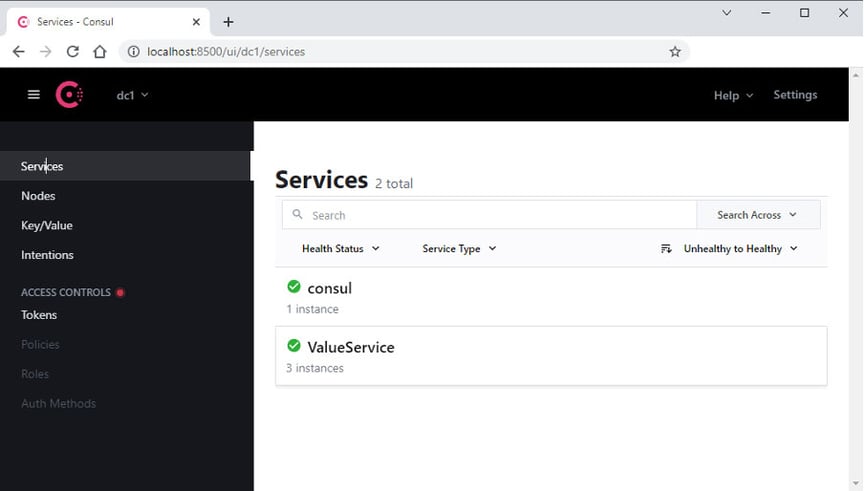
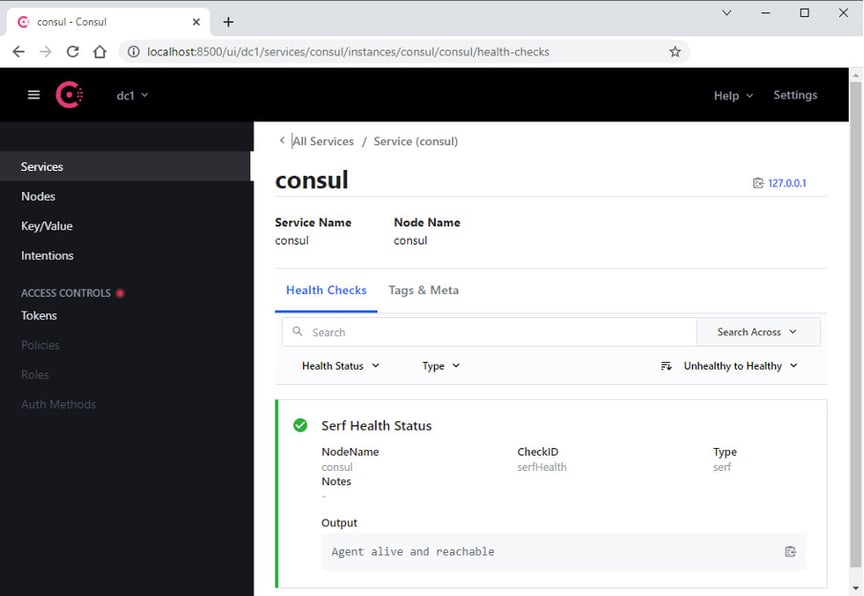
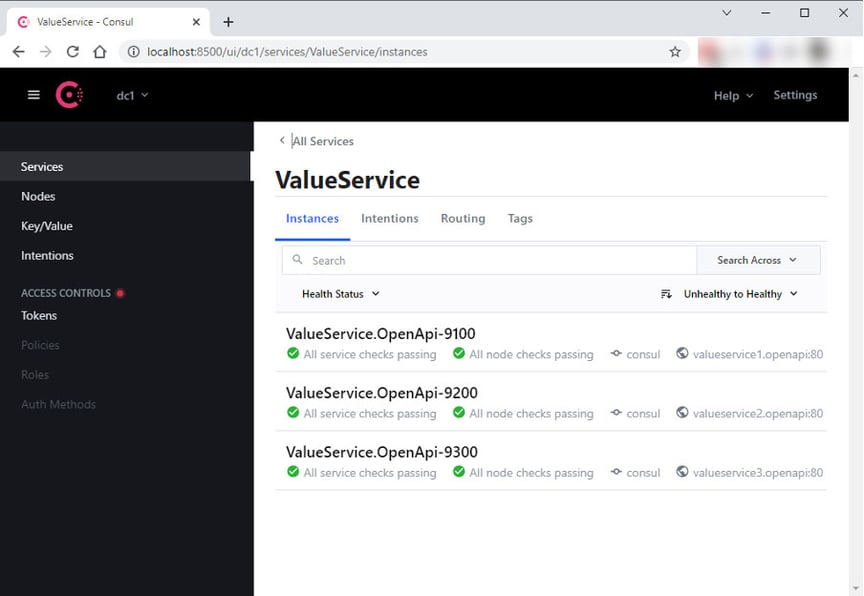
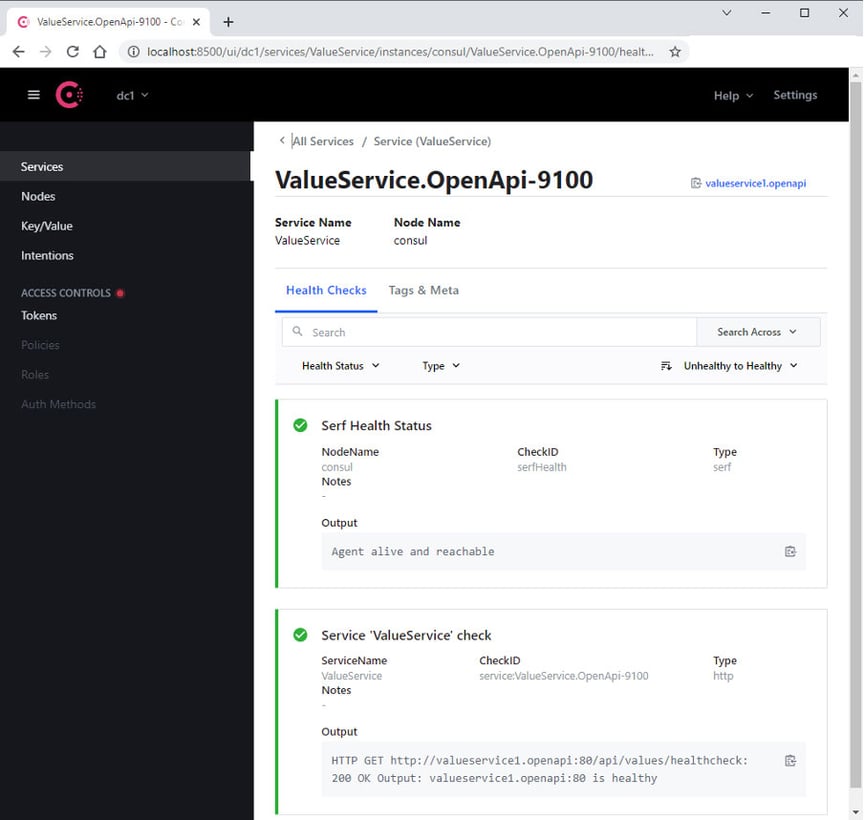
We can see that Consul provides us with a service registry and performs regular health checks on the services we have registered with it.
Check it out
Let’s make several calls through the API gateway at http://localhost:9500/api/values. The load balancer will loop through the available service instances, forward requests to them and return their responses:


You can now see the architecture in action, with the load balancer distributing the incoming requests across the available service instances.
Conclusion
Microservices systems are often not easy to build and maintain. However, this tutorial showed how easy it is to develop and deploy an application with a .NET microservices architecture.
As we have seen, Consul provides first-class support for service discovery, health checks, key-value storage for configuration items and multi-data centre deployments. Ocelot can be used to provide an API gateway that communicates with the Consul service registry and retrieves service registrations, while the load balancer distributes the load across a group of service instances by looping through the available services and forwarding requests to them.
Using both makes life significantly easier for developers facing such challenges. Wouldn’t you agree?
You can find the source code for this tutorial on our GitHub.
Tags & technologies
* Consul® is the registered trademark of HashiCorp.